How to Organize Your Fly Box
Know Your Flies & Catch More Fish
Join Our List
For Weekly Guides and Deals
Welcome to the FREE Guide for learning how to organize your fly box. This guide will give you a good understanding on the many ways you can assemble your fly box and provide some tips on how to keep them organized within the box.
This isn’t just about matching colors and sizes, this is about the strategy behind what flies you should carry on the water with you on any given day on the water. All the fly selection knowledge in the world is wasted if you don’t have the right fly in your box to match what the trout are eating.
This free guide will go over all the options you have to organize your flies in your box. Then we’ll give you a breakdown of the boxes we have in our arsenal. Since, this free guide was written, we’ve had so much positive feedback from it, that we decided to write an entire course on how to create the perfect fly box for any occassion. We have a deal going on for the course right now too at the bottom of the page. if you like what you read here and want to really dive deep into crafting the perfect fly box, then grab our course, you’ll be happy you did.
Now, onto the free guide!
General Tips on Organizing Fly Boxes
From different sizes, to colors, to patterns, to imitations, to types of imitations, to stages and more, there are a lot of ways to best sort your flies. Let’s address a few general tips that will help you find the best way for your flies.
Organize what You Can’t Memorize
If you know your flies names, sizes or weights by memory, then no need to organize a box by that way as simply looking at the fly tells you what you’ve got. You want to focus on creating a structure in your box that allows you to remember with ease what each fly is and does for you on the river. If you can’t remember what each fly imitates, then it’s likely best to organize your boxes based on the type of fly that pattern imitates (pats rubber legs = stonefly, Zebra midge = midge… well that’s an easy one but you get our point)
Birds of a Feather Should Stick Together
 Generally speaking if you have 6 parachute adams in grey that are size #20, it’s best to keep them all together. Nothing worse than thinking your out of a fly only to find it stashed under a bunch of big bulky dry flies when you get off the river that day. Keep the flies together that are similar as good rule to live by.
Use a Fly Box That Fits Your Flies

There are tiny midge boxes and large streamer boxes and everything in between. Make sure you have purchased boxes that fit the flies you own. I use standard boxes with slit foam that seems to fit most patterns 10-22 just fine. Then I have a box thats good for smaller than 22’s and a box thats good for streamers and bigger insects like hopper patterns and the like.
Whatever you fish, make sure you have a box that fits the flies.
I had a customer ask me the other day how I best organize my fly boxes. The more I thought about it, the more difficult it is since there are many ways to organize it. We decided to write a helpful mini-course on how to best organize your fly box.
We’ll provide some general tips before offering up all the ways we can think of to sort your fly box. After that, we’ll share the way we organize our boxes.
The Many Ways to Organize Your Fly Box
Choose the Option that Best Fits You
Ways to Organize Your Fly Box
Now let’s outline the ways you can organize your box and show the reasons why you may want to consider this option:
Flies by Imitation
This means organizing flies by the names, types of insects they imitate and stages they imitate. For example if you have:
- 4 #12 Parachute Adams, 4 #16 Parachute Adams, and 4 #20 Parachute Adams
- 4 #12 Tan Hares Ears, 8 #16 Black Hares Ears
- 12 #20 Red Top Secret Midges
With this selection you could add the Parachute Adams on a row cause they imitate a variety of mayflies and are the same color. You could group them by size too for convenience. Then the hares ears on a row and the top secret midges on a row. This is a simple way to organize them because you are able to see the patterns by size, color and pattern easily in a row. If you don’t have 12 or so of that kind, you can just use half a row.
By Pattern Type
If you’re a guy that carries 100’s of different patterns, you can also organize them by 4 categories based on the pattern category. This works well for guys who only have 1-2 of each fly but 100’s of different patterns.
- Imitative Patterns: flies that look alot like a given insect
- Attractor Patterns: flies that are flashy and meant to attract fish
- Search Patterns: flies that generally look like several insects and are meant to search out the trout
- Impressionistic Patterns: flies that specifically look like a few similar types of insects

Organize by Profile and Weight

Forget what the pattern is, the trout doesn’t know them. You just need to know what the pattern imitates in relation to the insects that are being eaten on that given day. If you organize by similar profiles you’ll get a variety to choose from based on conditions to imitate whatever is on the water. For nymphs, organizing by weight helps you get your flies to the right depth easily. Understanding weight is a key to good nymphing techniques after all. For dries, you can tie different color parachute posts for different sizes or different species you’re imitating to keep track and organize accordingly.
Organizing by profile, meaning the overall shape of the pattern will help you keep flies organized by what they imitate. Like the two pheasant tail variants on the left in the picture, though different colors, they are going to imitate the same insects by category mainly due to their similar profiles. Different colors may work on different days and some species of mayfly nymphs may be darker brown or closer to purple/black and thus one will outperform the other based on those changes. Overall, keeping flies that have similar profiles next to each other in your box is an easy way to keep track of what you have and narrow down your selection once you’ve discovered what the trout are eating.
Organize by Seasons & Water Type
This one is great cause you can add a variety of flies to each box so you have spring flies for spring time, tailwater flies for when you fish to picky trout who want small flies.
Keep in mind that spring time and fall are very often the same flies for the most part with a few additions/removals so grouping the spring/fall box is a great idea if you have room in your box and want to trim it down to a minimalist approach. In addition, I find combining the tailwater box with the winter box works well since fish seem to prefer smaller flies in the winter and on tailwaters year round. In addition a spring creek box is good cause the insect life and patterns needed are geographically unique to spring creeks, i.e. the abundance of scuds/sowbugs and other freshwater crustaceans vs a freestone river which will likely have a wider variety of insects.
Flies by Water Type
Freestones | Tailwaters | Spring Creeks | Stillwater
Flies by Season
Spring | Summer | Fall | Winter
Organize by Fly Type
Dry Flies | Nymphs | Streamers | Emergers | Wet Flies
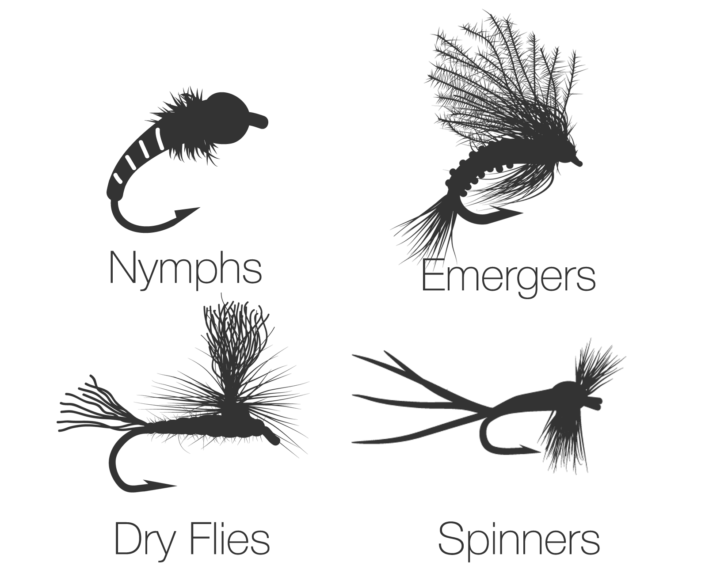 If you live by the dry fly or die, or a dynamic nymph fisherman or a stream junkie, then having a box with nothing but those flies is a great way to go as well. This lets you decide before you get on the water what technique you should focus on. Fly fishing is a passion of restraint after all and limiting yourself to less opportunity is in the very fabric of fly fishing. This is a simple and effective way to stay focused on a single technique each time you’re on the water.
Organize by Fish Target
Trout | Bass & Panfish | Carp | Bonefish | Tarpon | and More
 If you’re lucky enough to be able to fish saltwater, freshwater, warmwater and more on a consistent basis, you may be a good candidate for this option. Different species call for different sets of flies so organizing them based on what you’re going after gives you the ability to bring the right flies and know which box to choose. I personally bring a carp box with me when I fish low elevation streams or warmwater lakes knowing the chance of carp are worth bringing my carp box along.
Organize by Confidence
 We all have our confidence flies that work well. Stocking your box with those in an organized fashion is a very simple and effective way to fish. People who believe that presentation is all that matters and fly selection is just for fun often have only 10-20 patterns in their box and this option is great for those guys.
How We Roll
The Exact Way We Organize Our Fly Box
I personally find and would recommend a combination of boxes based off what fish you target. I recommend using the options I listed above together in the following order:
By Fish Type
- Trout Boxe
 s
s
- By Season & Water Type
- Spring Boxes
- Nymph Box
- Dry Fly Box
- Summer Boxes
- Nymph Box
- Dry Fly Box
- Hopper/ Big Dry Flies Box
- Fall Boxes
- Nymph Box
- Dry Fly Box
- Winter/Tailwater Boxes
- Nymph Box
- Dry Fly Box
- Stillwater Box
- Streamer Box
- Flex Box (Includes confidence flies or flies that are new ties that I’m trying, or overflow from other boxes that I want to have on me)
- Spring Boxes
- By Season & Water Type
- Warm Water Boxes
- Bass Box
- Carp Box (Commons and Grassies)
- Panfish Box (the Trout Spring/Fall boxes usually works for this too)
- Saltwater Boxes
- All Species Saltwater Box
- Surf Box (Smaller and easier to carry set of confidence flies)
- Steelhead Box
 s
s
This arrangement allows me to carry only 2-4 boxes at any time and be well stocked for wherever I go. I find this to be the most effective and efficient way to carry your flies and keep them organized.
As far as individual flies or flies by category within the boxes I categorize them this way.
- Bottom of box to top of box is biggest to smallest
- Left to right is smallest to largest
- Categorize by Midge, Mayfly, Caddis, Stonefly, Cranefly, Scud/Sowbug, Damsels/Dragons, Worms/Eggs
If patterns like a hares ear exist, I decide in my own mind the best fit. So if I think a hares ear most looks like stonefly in my head, I would add it to my stone section even though a hares ear can mimic a mayfly, midge, caddis, stone and scud and even sowbug! You ultimately need to decide what you think it looks like most and stick to it for organizational purposes.
Want the Complete Course on Crafting the Perfect Fly Box?
 We wrote this Free guide above a few years back, and it has had so much interest, we decided to build an entire course around the subject.
As it turns out, it’s a pretty detailed and strategic venture to craft perfect fly boxes for every occasion. Understanding seasonal hatches and events, and then knowing your insects stages and sizes for each category and species of insect is a daunting task to start and it that wasn’t enough, then it’s a matter of how to efficiently organize the flies into as few of boxes as possible so you don’t have to bring a pack mule with you on the river just for your flies.
In our paid course, we go over the A-Z of putting together the perfect fly boxes. From detailed explanations on which fly box to select all the way down to the exact fly, size, colors and quantities of flies to put in each fly box based on seasonal hatches and insect stages, colors and sizes etc. It’s over 140 pages and includes:
- Lifetime Access to the Course and Future Updates
- Two, 50% off coupons for flies and assortments
- 50% off coupon for any of our other courses
- 50% off our Catch n’ Hatch Fly Boxes
- Downloadable PDF for offline reading
- Downloadable worksheets of my fly boxes and a blank template to plan out your own fly box before you put flies in it
- Personal Guarantee you’ll love the course or your money back
Lifetime Access
Craft Your Fly Box Course
Normal Price: $99.99 | Lifetime Access: $49.99 (+ Coupons)
Before | After
Slide the Bar to View Before & After


Fully Online | Self Paced | Lifetime Access
140+ Pages | Pics | Diagrams | and More
Craft Your Fly Box Course
All your fly selection skills are worthless if you don’t have the right flies in your box when it counts. Learn the fly by fly, perfect boxes to have for any occasion on the water.
WHAT YOU’LL LEARN:
140+ Pages with detailed lessons to teach you what flies you should have in your box and what insects they imitate.
- Get fly by fly Steps to create the top fly boxes for every occassion
- Master the strategic approach experts use to create the perfect box
- Learn about insect lifecycles, seasonality, and planning for different bodies of water
- Learn the names of the most popular flies and the insects they imitate.
YOU’LL ALSO GET THESE FREEBIES:
- Two, 50% off coupons for any flies or assortments on our site ($100+ Value)
- Unlimited 50% Off Coupons for Catch n’ Hatch Fly Boxes ($10 + Value)
- An Downloadable PDF for offline Viewing
- Downloadable spreadsheet of my fly boxes, fly by fly & a template to create your own boxes
- Lifetime access to the course including future updates
- One, 50% Off Coupon for Any of Our Other Courses ($100+ Value)
Lifetime Access: $49.99
(Includes $200+ in Free Coupons)
COUPON CODE: CFBCOURSE49
Course Outline
Introduction | 4 Lessons | Conclusion
Introduction
In the introduction we explain the unique importance around this highly overlooked skill set for fly fishing. We discuss all the components that are available in the course as well as the coupon codes and freebies available in the course.

Lesson 2
In lesson two, we discuss all the different methods available when organizing your fly box. We go over the framework you need to learn in order to correctly craft your fly box with the right flies for the right situations using the right hierarchy of decisions.

Lesson 3
Now that you’ve learned all the methods and options available in lesson 2, we now go over our recommended process in lesson 3. We also go over a large amount of entomology information here teaching the 13 categories and 1-4 stages each insect goes through. We also go over all major species of insects and hatch times so you know what insects you need for each season and can craft the perfect fly box that covers all of your bases.

 Early spring is all about midges, annelids (worms), and small mayflies (BWO mainly). As spring picks up, caddis and stonefly nymphs become important and more mayflies hatch (hendricksons and march browns), then in late spring right before run off, you will see caddis hatches and early stonefly hatches depending on the year. Scuds and sowbugs are always on the menu and work best when other hatches or insect activity is less active. Craneflies and annelids work well when flows increase or after rains. These are all some general guidelines for spring time fly fishing to help you put the right balance in your box. I’d make sure your spring box is mostly midges and mayflies if you fish early season for example, and more heavy on caddis and stones if you fish mid to late spring. Balance it if you fish the entire season and so forth.
Lesson 4
In lesson four, we go over every single fly box we use and break down every fly pattern, size, color and quantity in each of those boxes so you have a super in-depth set of examples. We also include some excel spreadsheets to create your own fly box lists and get organized as you craft your fly boxes.

Conclusion
In the conclusion, we go over a four step process to create any fly box now that you’ve learned the framework, methods and seen our examples. We also discuss a few important concepts and ideas that really connect this knowledge back into a strategy that helps you catch the most fish possible every time you’re on the water.